I’ve been getting a lot of comments from the HS Seniors and their parents when they look at the images after the HS Senior portrait sessions: “Wow! That looks like it should be in a magazine!” Well, what is it about the images that say to them ‘it should be in a magazine’?
Well, it takes a nice looking model. That’s a ginormous step in the right direction, but it is not always necessary. But there is one thing that links all these images together: the lighting. During high school senior sessions, I set up a Beauty Booth, which is a lighting set up used by…you guessed it....photographers that shoot magazine cover shots. It’s not always an easy set up, seeing that I employ five different lights to get it to look the way I want it to. However, instead of spending thousands of dollars on equipment, I’ve manufactured much of it myself…and that money instead stays in my pocket. Here's how it's done.
Ingredients:
1 beautiful high school senior
5 lights
3 reflectors
10 ft. of paper
½-witted photographer
Let me first say that I do not photograph everyone this way. I photograph all of my HS seniors to bring out their personality and embellish it a little bit. Don’t look at me that way…we all embellish the truth. Did you ever write a resumè? Or worse yet, read a co-worker’s resumè? ‘Nuff said.
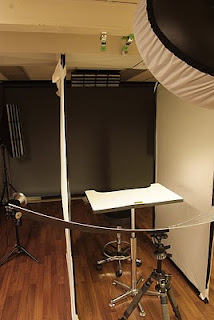
Not every HS senior has the personality to be comfortable with the look of being a cover model. But when they do (or they ‘want’ to), I set up the booth as they are changing clothes. Here are the lights I used: main, hair, two accent lights, and background.
 |
| Beauty Booth Lighting Setup |
I always start with the background accent lights. The reason being, if I started with the key light and reflectors, then I wouldn’t have as much room to get to the back lights in my ‘cozy’ studio.
The two back accent lights are pointed at the subject from a 45 degree angle behind, one on each side. I made my own strip light modifiers and grids to go in front of these lights, because I could not find any that were satisfactory for these old and inexpensive strobes. The hair light is mounted to the ceiling, and is also outfitted with a DIY strip light and grid.. These lights are all the same power. All three of these lights provide a sliver of light on either side of the subject and along the top of the hair. These are used to separate the subject from whatever background you are using.
The background and the dedicated light for it gets set up next. I go back and forth between using white or grey seamless paper. The light is set up so that it lights up the whole background.
 |
| Model's View from the Booth |
 |
| Closer View of Booth |
The two white panels get slid into place next. They bounce all the great light back to the subject and remove almost all shadows on the side of the model’s face and torso. Mine happen to be Lightform reflectors, but any large, white pieces of reflective material will work.
The overhead main light, outfitted with a 24” beauty dish and diffusion sock, goes up next. I mount this to a pipe support attached to the ceiling in my studio (I call it the “non-boom” boom arm), because it gets it up out of the way and there are no stands or cords in the way.
The eye lighter reflector goes in last. Again, another original design DIY project. It’s robust, sturdy, and works as well as the $500 version, yet mine is more travel-friendly and stores conveniently flat against the wall when not being used. Oh, and it only cost $21 to make, because I used materials that I already had.


No comments:
Post a Comment