

This
attachment is meant to expand the capabilities of your shoe-mounted flash by
giving it the appearance of being a bare bulb, which spreads light in 360
degrees, not just in the direction the flash is pointed.
You
can buy similar attachments that cost upwards of $100 or more that do the same
thing. I made this one for about
two-and-a-half bucks and maybe 15 minutes of time. You do the math. Then go spend that saved money on something
worthwhile, like a couple of new games for your X-Box.
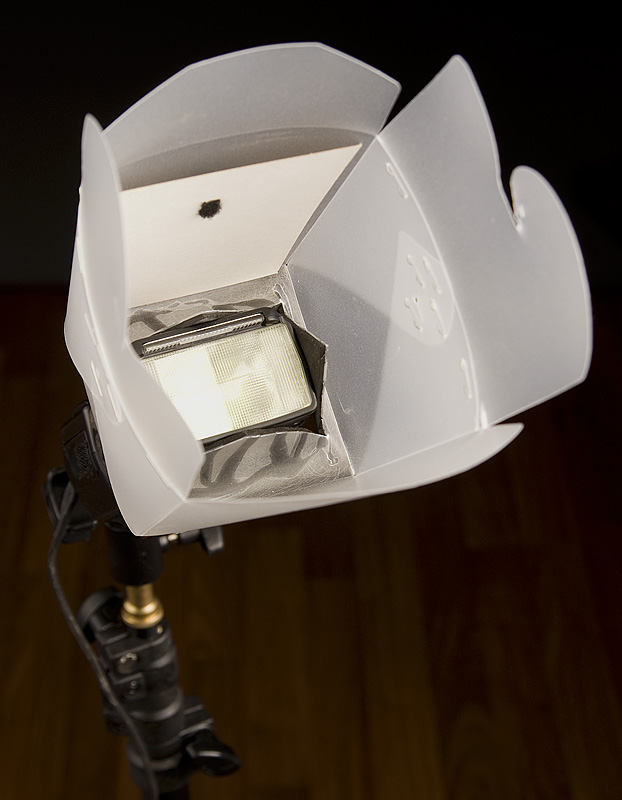
This
attachment is made using a plastic box that’s in the shape of a Chinese food
takeout container. I bought this one at
a craft store (Michael’s) for around a $1.50.
It’s about 4 or 5 inches square, and is made of a light-weight frosted
plastic material. They sell similar ones
in smaller sizes (~2x3 inches) or in different colors, and are marketed as
goodie bags/boxes for children’s parties.
If you want, you can use the smaller clear frosted ones to put over your
flash…they are very similar in size to the Sto-fen Omni Bounce, and you can
probably adapt that size to fit over any size flash head without any
issues. I opted for the larger size.
Do
yourself a favor…don’t reach in the back of your fridge and use the food carton
with the 3-week old leftover lo mein in it.
There are 3 reasons:
1).
The lo mein will make the outside of your flash stickier than all
get-out;
b).
The soy sauce will short out the electronics in the flash;
3).
The cardboard is opaque, and light won’t travel through it.
If
there is a sticker or label on the bottom of the box, remove it first. It’s easier doing it when you can get your
hand inside the box, than later…like I did the first time I made one. Note To Self #1.
Next,
you would cut off the wire handle…you don’t need this. Unfortunately, the handle also holds the
sides together, so now you have to secure them together. I didn’t think glue would hold, given the
side-to-side forces it would experience, so I used staples…three per side.
Now
that the sides are secured, you can turn your attention to the top. The four lid pieces all fit together in an
overlapping fashion, similar to how you would close the flaps of a cardboard
box. I used quick-setting epoxy to seal
the lid, so with the lid closed, I figured out where on each flap I needed to
spread the glue…call these “target spots”.
You don’t want to spread the epoxy over the whole flap…you’ll end up
with a gooey mess when you’re done. To
ensure a good adhesion of the epoxy on the slick plastic surface, it lightly
sanded the “target spots” with sand paper…just enough to rough up the
surface. All glues and epoxies need a
little “tooth” to the surface to stick well, and the surface on this box is really
slick. I used two-part epoxy, so I mixed
up parts “A” and “B, then spread them on the “target spots” of the flaps, then
carefully closed the flaps, so that the glue would not get on any surfaces that
would end up being exposed. You don’t
want your sticky goo on exposed surfaces...just ask Monica Lewinski.
The
epoxy needs some time to set up, so you can temporarily tape the lid shut, to
keep it immobile while the epoxy takes hold.
Set it aside for now. While the
epoxy is working its magic, go make yourself a sandwich. Or finish off the lo mein in the cardboard
carton in the fridge…it’s on the 2nd shelf in the back left corner,
behind the mustard.
Cut a
square from the craft foam that is approximately 3 inches square. I used black foam (also purchased at your
local craft store). You won’t need the
whole sheet for this project...and you’ll find plenty of other uses in your
studio for it. The cut piece of foam should
fit the bottom of the plastic carton, but doesn’t have to cover the whole
carton. I rounded the corners of the
foam once I cut it out. Ask anyone who
has ever patched a piece of clothing…a square corner on a patch is always the
first thing to start pulling up. Once
the epoxy on the lid has set up, I used a hot glue gun to attach the square of
craft foam to the bottom. It’s important
that the label has been removed from the bottom of the box, because the foam
and hot glue will eventually pull off the label.
 Once
the glue has cooled and set, set the box upside-down on the table and trace the
head of your flash on the craft foam.
Don’t worry, you don’t need a dark line; you just have to be able to see
it to guide yourself to make the cut…I used pencil. Now draw a diagonal line from corner to corner
of the traced rectangle, extending beyond the edges of the rectangle by approximately
¼”. Use a utility knife to cut along
these two diagonal lines, which will result in an “X” shaped cut through the
foam and the bottom of the box. If
you’re under 18, get your parent’s permission before using the knife. If you’re over 18 and super klutzy, get your
parent’s permission and have a first aid kit handy.
Once
the glue has cooled and set, set the box upside-down on the table and trace the
head of your flash on the craft foam.
Don’t worry, you don’t need a dark line; you just have to be able to see
it to guide yourself to make the cut…I used pencil. Now draw a diagonal line from corner to corner
of the traced rectangle, extending beyond the edges of the rectangle by approximately
¼”. Use a utility knife to cut along
these two diagonal lines, which will result in an “X” shaped cut through the
foam and the bottom of the box. If
you’re under 18, get your parent’s permission before using the knife. If you’re over 18 and super klutzy, get your
parent’s permission and have a first aid kit handy.
Now
simply insert your flash into the bottom of your new bare bulb attachment. The craft foam provides some friction and
holds the attachment securely on the flash.
Otherwise, you have the slick surface of the box sliding on the slick
plastic surface of the flash, and you’ll be spending more time picking your
bare bulb attachment off the floor than you’ll spend using it.
You
can now enjoy the benefits of a bare-bulb flash with any shoe-mounted
flash. Use it during wedding receptions
to bounce your flash all around the dance floor and off the ceiling, providing
a nice, soft light for your dancing fool subjects. If you want to make the box more efficient
and project more light forward (and waste less light out the back of the box),
you could always cover one of the interior walls of the box with silver or gold
reflective material before you seal the box shut. Just be sure that when you are tracing the
head of your flash on the craft foam prior to cutting it, that you orient the
flash so that its back is in-line with the side of the box with the reflective
material.


I use this modifier most often as a background light, when I
need the hot shoe flash to throw light in all four lateral directions and up
(or three lateral directions, if the reflecting cardboard is used).

For this on-location high school portrait image, I sent my unknowing assistant down
into the deep, dark, spider web-covered stairwell with the
appropriately-outfitted flash, which also had an orange gel taped to it’s head,
to warm up the dark and dank red brick.
My trusty volunteer assistant for this job did not get paid well enough
to do this, as I’m sure this staircase descended directly to Hell…it was the
steepest and darkest stairwell I had ever seen.
But the light modifier was up to the task, lighting the pitch-black
stairwell into a nice, warm, glowing, and inviting. Not bad for $2.00 and 15 minutes of
construction time.
If
you wanted to extend its use even more, surround the four side of the box with
black craft foam and turn it into small soft box, suitable for table-top still
life images. Or extend the black foam on
all four sides and make it a snoot, and use it as a hair light or localized
accent light.
No comments:
Post a Comment