 Chefs who cook without recipes go on instinct, knowing when to add a pinch of ‘this’, or a pinch of ‘that’. If a newbie cook were learning from them, they’d ask: “how much is a pinch”? Almost always, the answer would be: “it’s just the right amount, and you’ll know if it is too much. Like the kid who gets his pudgy cheeks pinched by his scary Aunt Betty, too much is too much.
Photographers cook with light. As you get better and better at it, you start realizing when and where you need a pinch of light to set your image apart from everything else out there. Often, an umbrella or soft box over your light source will add too much light. Like the kid with the pinched cheeks, you’ll get all irritated and run screaming into the other room.
So, when you need a pinch of light, how do you get it? The two easiest ways are to restrict the amount of light, or restrict the spread of the light. I like to restrict the spread of light by using grids, snoots and baffles in front of my strobes. Studio strobe manufacturers make snoots and grids for their products, and they are readily available. As I employed smaller hot shoe flashes into my lighting arsenal, I found that there were not grids at that time that were available. Research on the internet led me to The Stobist blog, where incredible photographic cooks bake incredibly delicious images using nothing but small hot shoe flashes. And thus the DIY grid was cooked up.
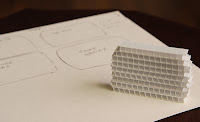
This version of a lighting grid basically involves placing numerous small tunnels in front of the flash, so the light can only travel down the tunnels, and can’t spread all over the place. Look through an empty paper towel cardboard tube, and you’ll get the idea. Now put 50 of them together, side-by-side, and you’ll get the idea.
The Recipe
 |
| Strip o' coroplast |
 |
| Coroplast |
The base material is coroplast, which is a plastic version of corrugated cardboard. You can buy it at any sign making company, or acquire it like I do. On the 2nd Wednesday of November, I recycle several of the thousands of political signs that litter our yards and highways from September through the 2nd Tuesday of November of every year.
 |
| Several strips o' coroplast |
I cut the material into thin strips, perpendicular to the internal ribs that form the ‘tunnels’ through the center. The width will vary. I cut ½”, 1¼” and 2” strips….the wider the strip, the more the light is restricted and the tighter the pattern will be. Look through an empty paper towel cardboard tube, then through a toilet paper cardboard tube, and you’ll get the idea. Just wait until Aunt Betty gets out of the bathroom before you steal the toilet paper tube. Those are cheeks that don’t need to be pinched.
 | ||
| Glued-up blank |
Smaller individual lengths are cut from that long strip to match a template I traced from the face of my hot shoe flash. The strips are hot glued together to form a shape that matches the face of the flash. After tending to the minor burns from the hot glue, I’ve toyed with the idea of using double-sided tape like others have done, but I’m a glutton for punishment.
The grid is then wrapped in a length of black craft foam, which is available in most craft stores, like Michaels. Kids use various colors of these thin foam sheets for crafty rainy day projects. I cut the strips of craft foam to a width that will match the width of the coroplast strips, plus at least 1” longer that will fit over the face of the flash to hold it in place.
 |
| Applying the foam wrap |
 |
| Finished grids |
 |
| Grid in use |
Taste Test
I use the grids over the flash to restrict the spread of the light when I want to add just a pinch of light somewhere in the image.
Often I’m adding a spot color of light in the background. To do this, I place a small piece of colored Roscoe gel inside the grid before I place it on the flash. The images of the hockey goalie and the guitar player show examples of studio and location portraits where a pinch of colored light was added behind the subject to add some interest.
 |
| Studio portrait with spot color using DIY grid |
 |
| Location portrait with spot color using DIY grid |
 |
| Accent light on subject using DIY grid |

Great idea and an awesome way to help the environment at the same time...now if we could just recycle some of our elected officials...
ReplyDeleteWhat tool did you use to cut the coroplast?
A sharp knife and straight edge was all that I used. Once I had a long strip cut in the width that I needed, I cut each section to length with a pair of scissors.
ReplyDeleteThis blogging platform is no longer used. If you'd like to continue to follow me, please go to: http://www.lukephotography.com/blog/
ReplyDelete